When working with clients and teaching them about proper makeup application, I usually start with explaining the importance of using brushes when putting on their makeup. Most people don't typically use brushes, and don't know why they should. So I am going to go through the type of makeup brushes that are available, what they are for and why they are important. I know that it seems like an expensive investment when your used to using your fingers, or the sponge that comes with your compact, but I promise you once you start applying your makeup with the proper brushes, you will definitely see a difference and won't ever go back to using your fingers!
The most important brush you should use is a Foundation Brush.

A Foundation Brush is used to apply liquid foundation. Most people use their fingers, or a sponge for their foundation, and that is the worst thing you can do! Unless you have extremely clean hands, using your fingers is going to spread dirt and bacteria around your face, get into your pores, and make you break out. Its also hard to get a smooth finish using your fingers, so you end up having streaks on your face, or spots that end up thicker then other spots leaving you looking blotchy. Using a sponge is another bad idea. A sponge absorbs liquids, which means that it will also absorb product. About 50% of your foundation is going to end up inside of your sponge rather than on your face where you need it. This means you end up using way more product then you need to and you will run out of your product faster. This is good for those of us who are making money off of you buying foundation more often, but not good for those who are buying the foundation! The best way to put on your foundation is with a Brush. The soft and tightly packed bristles offer you a smooth, flawless finish with the end result looking fantastic! You wont be spreading bacteria into your pores, and your not wasting any product. Just make sure you wipe the brush with a makeup remover wipe, or spray with a brush cleaner after each use.
Prevent Settling with a Jumbo Sponge Brush!
Ever notice that as the day goes on, your liquid foundation settles into your lines and wrinkles? Now you can prevent that by blotting away excess product with the sponge brush. After you apply your liquid foundation, let it sit for about 1-3 mins, then use the flat surface of the sponge to blot away excess product in problem areas (around mouth, eyes, frown lines, etc.). Do this before applying your powder, and you wont have settling in your wrinkles.
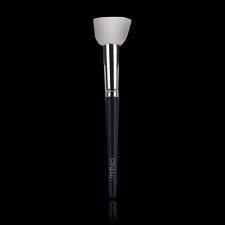
Next, you need a Powder Brush.

$14.95 Buy Here!
A powder brushed can be used to apply loose or pressed powder foundation. Now a sponge can be used for powder (its not going to absorb product like it does for liquid foundation), but a brush gives you a more airbrushed look. A lot of people think that they can get more coverage by using a sponge. While it is true that a sponge can give you good coverage, a brush can give you the same amount of coverage with a better end result. The trick is where you hold the brush, and how much product you put on the brush. Swirl your brush in your powder compact, tap two times on your finger to get rid off excess product (this prevents you from getting powder all over your clothes) and then press the brush onto your face making circular patterns. Holding the brush tightly at the base will give you more coverage and thicker application, while holding the brush loosely in the middle will give you lighter effect.
A definite must have is the Kabuki Brush!

If you can only afford to get one makeup brush, this is the one to start your collection! A Kabuki brush has a variety of uses. You can use this to blend your makeup, apply powder, use for bronzer, blush, fixes mistakes (too much blush) and the list goes on and on! The short handle and tightly bound bristles makes for a great deposit of pigment, and distribution of product. I guarantee you will use this everyday, and for multiple purposes.
Of course everyone needs to have a Blush Brush.

There is no way getting around this one. To wear blush, you must have a blush brush. This brush is smaller than the powder brush and angled to give you the perfect blush application every time. If the blush brush you are currently using is not angled, you should get one that is. All you need to do is swirl the brush in the blush compact, suck in your cheeks, line the bottom of the brush up with the top of the line that your cheeks create, and apply the blush creating a path to the top of your ear. Make sure you don't apply too much! Just enough to give you a natural glow.
For the perfect eye-shadow, use Eye Shadow Brushes.


It makes life so much easier when you apply your eye-shadow with brushes. Using the applicators that come in your eye-shadow compact are perfect for applying the base color on your lid, but typically we put 3 to 5 colors on the eye, so how are you supposed to do that and make it look pretty with a foam applicator? If you want precision, definition, contrast, blending, and clarity.....you need to use brushes! Use an eye-shadow brush (or the foam applicator) to apply the base color (lightest color) on your lid, then use the detailing brush and make a "C" pattern on your crease using the 2nd darkest color, wet the end of the liner brush and use it to apply the darkest color along your lash line. Then smooth the edges and blend it all together with the blending brush. I will talk about more advanced eye-shadow techniques in future blog posts, but that is the basic application technique. And remember, practice makes perfect!
Make your tube of lipstick last longer by using a Lip Brush.

How many times have you applied your lipstick from the tube, then used a tissue to blot away the excess? When you do that you are simply wasting precious product. We tend to be heavy handed when we put on our lipstick and press down too hard on the tube. In result, we get a lipstick bullet that's hollowed out in the middle and tends to take on the shape of our lips. Instead, use a lip brush and wipe it across the bullet of your lipstick and apply it to your lips that way. In result, you end up getting a better look and you don't have to blot! Your saving product and not wasting tissue!
It's hard to get all the makeup brushes you need at one time since it can become so costly. I recommend starting out with one or two brushes that you think you would use the most (foundation brush and kabuki brush are two good ones to start with), then buy the rest slowly until you have everything you need. I still don't have all the brushes that I need! Just try to buy one a month, and once you have them all, they will last you forever! As long as you buy good quality brushes (like these). Its so tempting to buy cheap brushes, I know because I have done it! Trust me, you get what you pay for. Cheap brushes generally have fewer bristles which means you don't get the same coverage or application. Ever use a cheap eye-shadow brush and you cant even see the color you put on? Its because there aren't enough bristles in the brush, and the bristles that they have are bound together with cheap glue- which results with you having bristles all over your face! Cheap Products = Cheap Quality.
Another solution I recommend is getting a Starter Kit.

7 Piece Starter Brush Set $35.00 Buy Here!

15 Piece Pro Brush Set $105.00 Buy Here!
By buying brushes in a set, you are getting them at a cheaper cost then you would by buying them individually, and it gives you a head start to your collection.
After you get all your makeup brushes, you want to maintain your investment by taking proper care of them. You can make your own brush cleaner at home for free, and preserve the life of your brushes. Get a small spray bottle from the dollar store and add about a tablespoon of your face wash (this way you know the soap your using wont make you break out). Fill the rest of the bottle with water and shake, shake, shake! After your done using your brushes, spray a face cloth with your homemade (or you can buy some if you prefer) brush cleaner, and wipe the brush in the wet area until your brush looks clean. Do not spray your brush directly with the cleaner! The moisture can loosen the bonds and cause your bristles to fall out.
I hope all these tips on Make-Up Brushes was helpful, and good luck on starting your own brush collection! I promise you once you start using brushes to apply your makeup, you'll never go back to your fingers or sponges again!